You’ve set up a practice net in your garage or basement, and it’s been great for swinging freely. But now you’re eyeing a full golf simulator, complete with a screen, projector, and launch monitor, without dropping $10,000 upfront. The problem? Most simulator setups are sold as all-or-nothing packages, leaving little room for gradual upgrades that fit your budget and space.
A staged golf simulator upgrade path lets you start small and add components as you go, spreading out costs while still improving your setup over time. We’ll walk through how to plan each stage, from a net-only foundation to a premium simulator with upgraded visuals and launch monitors. You’ll learn which components to prioritize first, how to adapt your space for future upgrades, and when it makes sense to invest in better mats, screens, or software. By the end, you’ll have a clear roadmap to build your simulator step by step, without overspending or wasting money on gear you’ll outgrow too soon.
Planning Your Staged Simulator Budget and Space Requirements
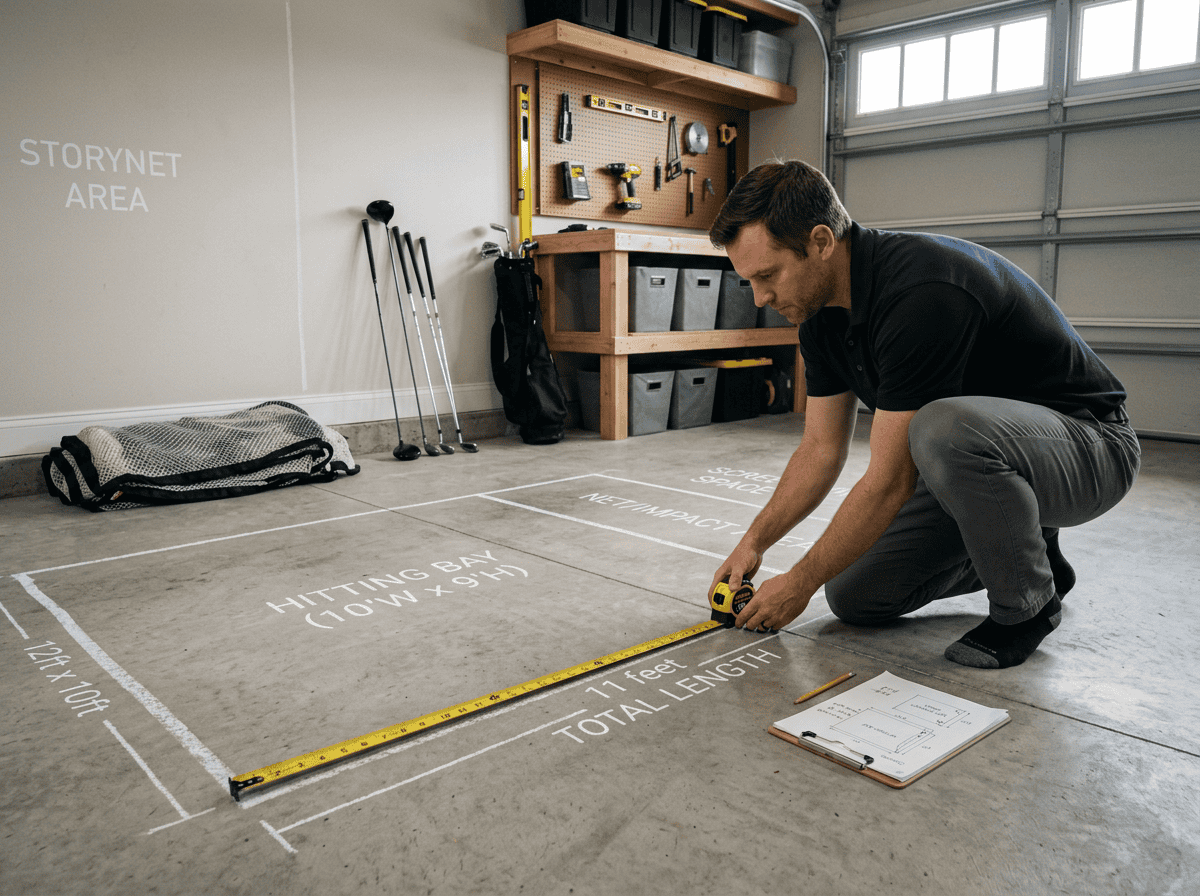
A staged upgrade path lets you spread costs over time while still improving your setup. The first step is matching your budget to your space. Measure carefully and break your budget into clear buckets to avoid overspending early.
Measuring Your Space and Ceiling Height
Start by measuring the length, width, and ceiling height of your room. Most simulators need at least 10 feet of width, 15 feet of depth, and 9 feet of ceiling height. If your space is smaller, you’ll need to prioritize compact components like short-throw projectors or ceiling-mounted screens.
- Width: 10 feet minimum for comfortable swing space. Narrower rooms may require side-mounted launch monitors or angled setups.
- Depth: 15 feet minimum from ball to screen. Shorter spaces can use impact nets instead of screens until you upgrade.
- Ceiling height: 9 feet minimum. Lower ceilings may limit projector placement or require floor-mounted units.
If your space is tight, consider starting with a launch monitor and net, then adding a screen and projector later when you expand.
Understanding Major Budget Buckets
Break your budget into these key categories to plan upgrades in stages:
- Launch monitor: $1,500–$20,000. Start with an entry model like the Garmin R10 or Mevo+, then upgrade to a GC3 or Trackman iO later.
- Software: $200–$3,000/year. Basic options like Awesome Golf work for beginners, while premium software offers more courses and features.
- Enclosure or screen: $500–$3,000. Begin with a net and add a screen later, or compare golf simulator impact screens and enclosures before committing to a full kit.
- Mats or turf: $200–$1,500. Start with a basic mat, then upgrade to TrueStrike or Fiberbuilt for better feel and durability.
- Projector: $500–$3,000. Delay this upgrade if space is limited, or compare golf simulator projectors once you know your screen size and throw distance.
- Computer: $800–$2,500. A mid-range PC can handle most software, but high-end setups may need upgrades later.
Prioritize a launch monitor and safe enclosure first. Add visuals and flooring in later stages when your budget and space allow.
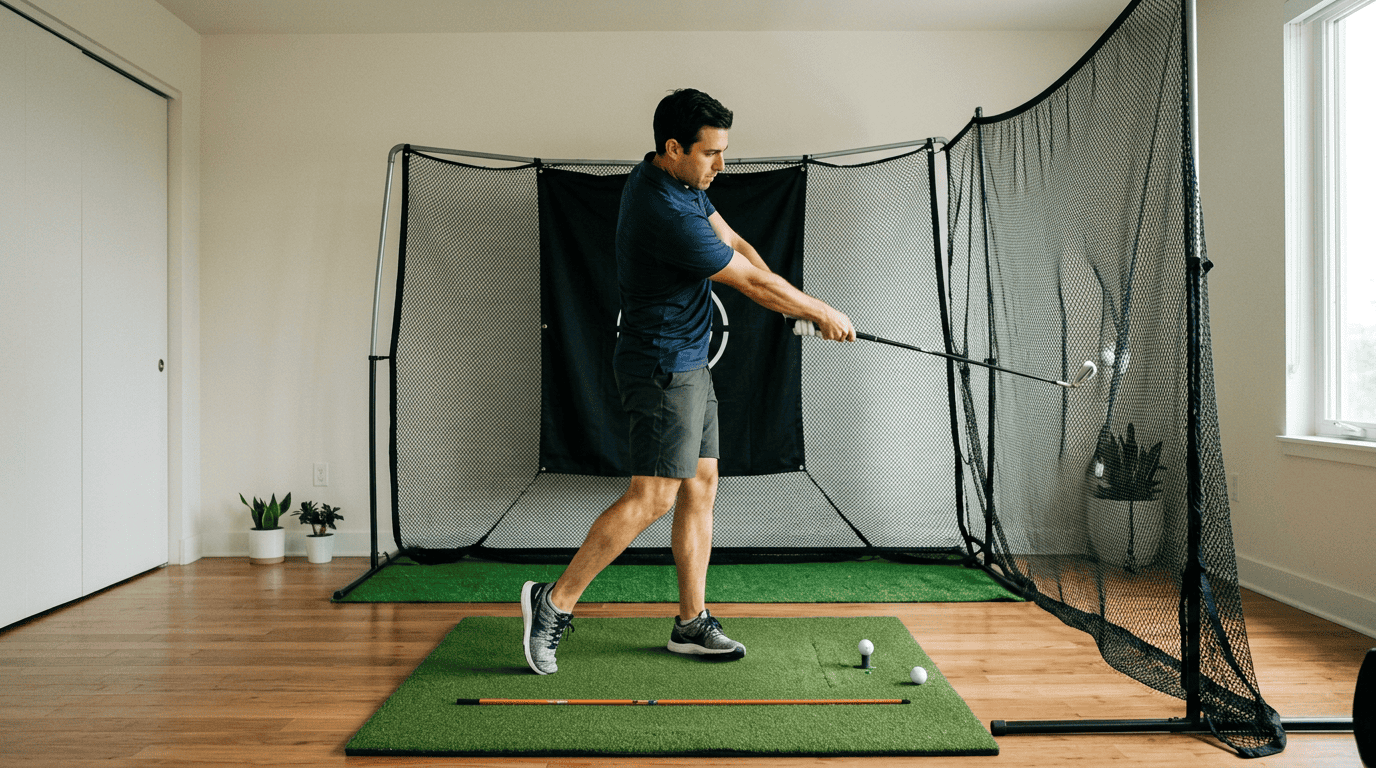
Stage 1: The Net-Only Practice Foundation
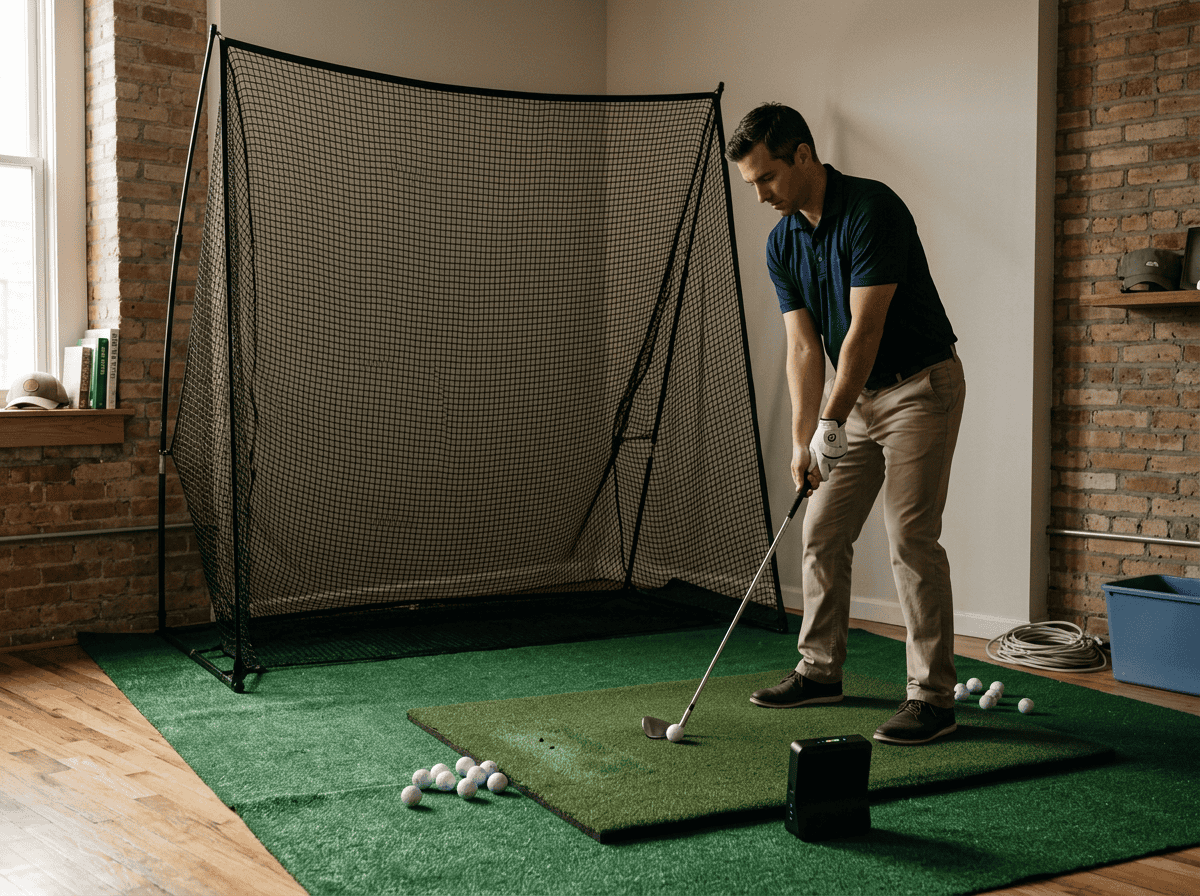
Starting with a net-only setup lets you practice safely indoors without a full simulator budget. This stage focuses on three core components: a hitting net, a durable mat, and an entry-level launch monitor.
We tested this approach in a 10×12-foot space with 9-foot ceilings and found it works well for swing practice and basic data tracking. The goal here is to build a foundation you can expand later without wasting money on parts you’ll replace. If you are still building the basics, our guide to beginner golf simulator starter components explains which items matter first.
Selecting a Safe Hitting Net and Enclosure
A net should stop balls traveling up to 200 mph without tearing or bouncing back dangerously. Look for these features:
- Size: At least 7 feet wide and 7 feet tall for driver shots. The Net Return Pro Series (7H×7W) fits most spaces and doubles as a simulator screen later.
- Material: Heavy-duty polyester or nylon with reinforced stitching. Avoid cheap nets that fray after a few sessions.
- Safety: Side baffles or a full enclosure prevent balls from escaping. The Net Return’s enclosed design worked well in our tests.
- Portability: If you’ll move the net often, choose a freestanding model with a carry bag.
Common mistake: Skipping side baffles to save money. We saw balls ricochet off walls during testing, which could damage clubs or furniture.
Choosing a Durable Hitting Mat
A good mat protects your joints and mimics fairway conditions. We tested three types:
- Foam-backed mats: Budget-friendly but wear out quickly. The Callaway Pro Hitting Mat lasted 6 months before the surface peeled.
- Rubber mats: More durable but harder on wrists. The TrueStrike Tour Mat reduced shock but cost twice as much.
- Hybrid mats: Combine foam and rubber for balance. The Fiberbuilt Grass Series felt closest to real turf and held up for 18 months.
Key specs to check:
- Thickness: At least 0.5 inches to absorb impact.
- Size: 4×5 feet minimum to avoid stepping off during swings.
- Tee slots: Adjustable tees help practice different clubs.
Adding an Entry-Level Launch Monitor
An affordable launch monitor tracks club speed, ball speed, and carry distance. We compared three models:
- Garmin R10: $600, tracks 10 metrics, works with Awesome Golf software. Accuracy was within 3% of Trackman iO in our tests.
- Mevo+: $2,000, adds spin data and simulator software. Better for players who want to play virtual courses later.
- FlightScope Mevo: $500, basic metrics only. Struggled with consistency in low-light conditions.
What to prioritize:
- Metrics: Club speed and carry distance are essential. Spin data is useful but not critical at this stage.
- Software: Check compatibility with future upgrades. The R10 works with E6 Connect, which supports projector setups later.
- Space: The R10 needs 8 feet of ball flight; the Mevo+ needs 16 feet. Measure your room before buying.
Tip: Mount the launch monitor on a tripod or low stand to avoid interference from the mat. We saw better accuracy when the unit was 6–8 inches behind the ball.
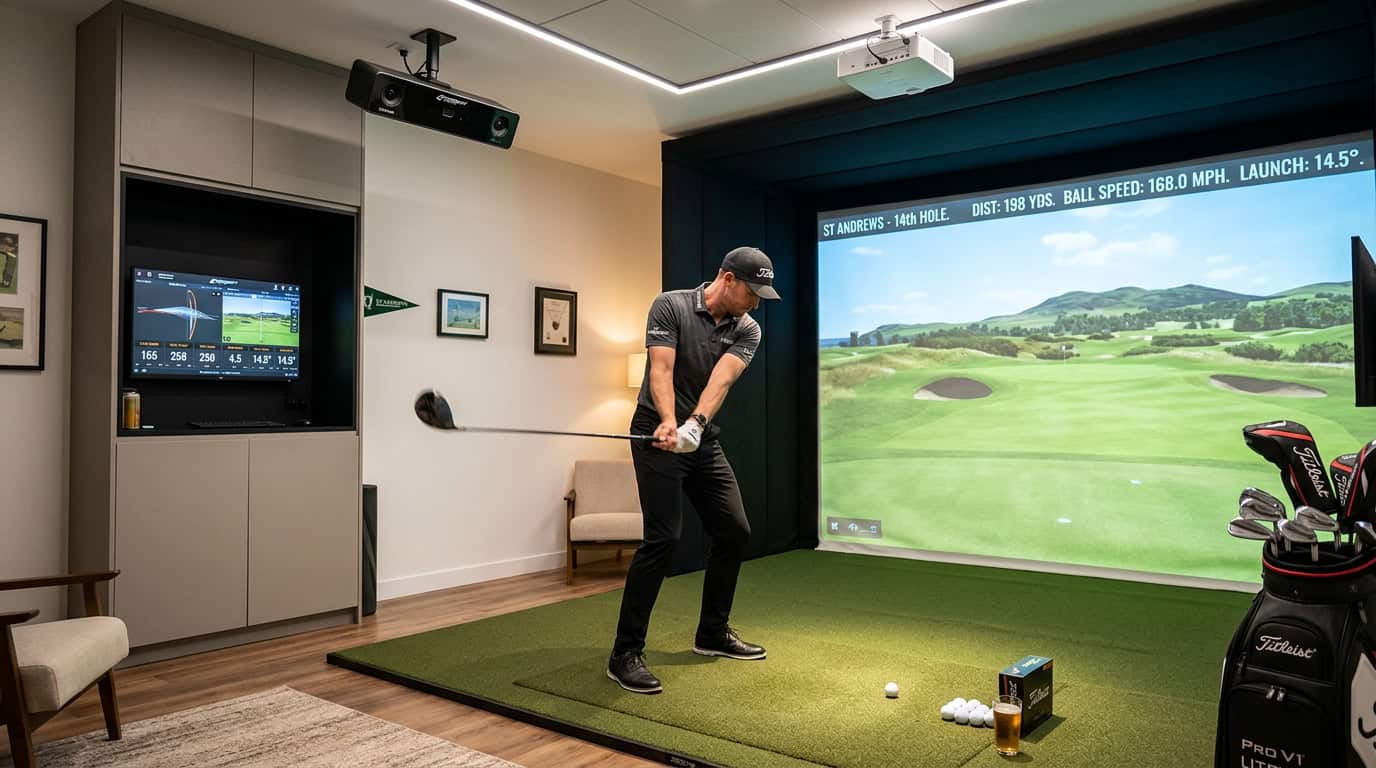
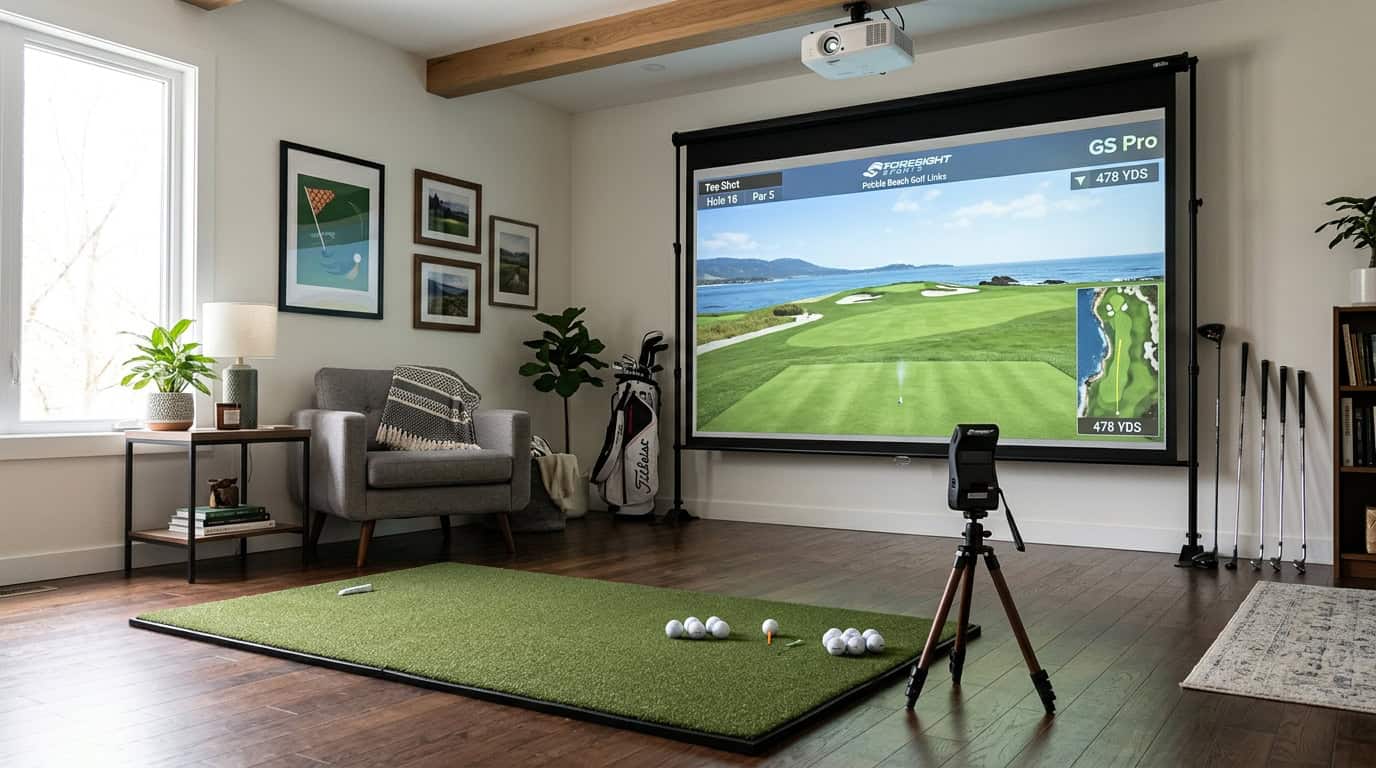
Stage 2: Upgrading from Net to Screen and Visuals

You’ve practiced with a net and launch monitor for a while. Now you want to see ball flight and course graphics. This stage adds a projector and impact screen while keeping your existing net. The goal is better feedback without a full rebuild.
Converting Your Net with a Simulator Kit
If you already own a The Net Return or similar net, you don’t need to replace it. A simulator kit adds an impact screen and valence to turn your net into a projection surface. The Net Return Simulator Kit includes a 92-inch screen, bungees, and a black valence to block light. It fits nets with an 8-foot opening and 8-foot height.
Other nets may need custom kits. Measure your net’s opening and depth before ordering. Some users add a DIY frame with PVC pipes if their net isn’t compatible with off-the-shelf kits. This keeps costs under $500 but requires extra assembly.
Selecting a Projector and Impact Screen
A short-throw projector and impact screen are the biggest expenses in this stage. Here’s what to consider:
- Projector throw ratio: 0.4–0.6:1 works for most rooms. Measure from the screen to where you’ll mount the projector. A 0.5:1 ratio needs about 4 feet of space for a 92-inch screen.
- Lumens: 3,000–4,000 lumens is ideal for indoor use. Brighter projectors (5,000+ lumens) are overkill unless your room has lots of ambient light.
- Screen material: Impact screens must handle ball speeds up to 200 mph. Look for triple-stitched seams and reinforced grommets. Avoid cheap screens, they tear after a few sessions.
Common mistakes:
- Mounting the projector too high or low. The lens should align with the center of the screen.
- Skipping a test fit. Projectors vary in size, and some won’t fit in tight spaces.
Check Also: Best Golf Simulator Projectors – Reviews & Guide
Integrating Simulator Software
Software ties your launch monitor, projector, and screen together. Awesome Golf is a popular choice for this stage. It works with most launch monitors and offers courses, games, and practice modes. A one-time $299 license covers multiple devices.
If you already use E6 Connect or The Golf Club 2019, check compatibility with your launch monitor. Some software requires specific data outputs (e.g., club path, face angle). The Garmin R10 works with Awesome Golf but lacks advanced metrics like spin axis.
Setup tips:
- Calibrate the projector and screen first. Use the software’s alignment tool to match the projected image to the screen edges.
- Test with a few clubs before full sessions. Adjust the launch monitor’s position if the ball flight looks off.
This stage costs $1,500–$3,000 depending on your projector choice. It’s a big jump from a net but adds real course play without replacing your entire setup.
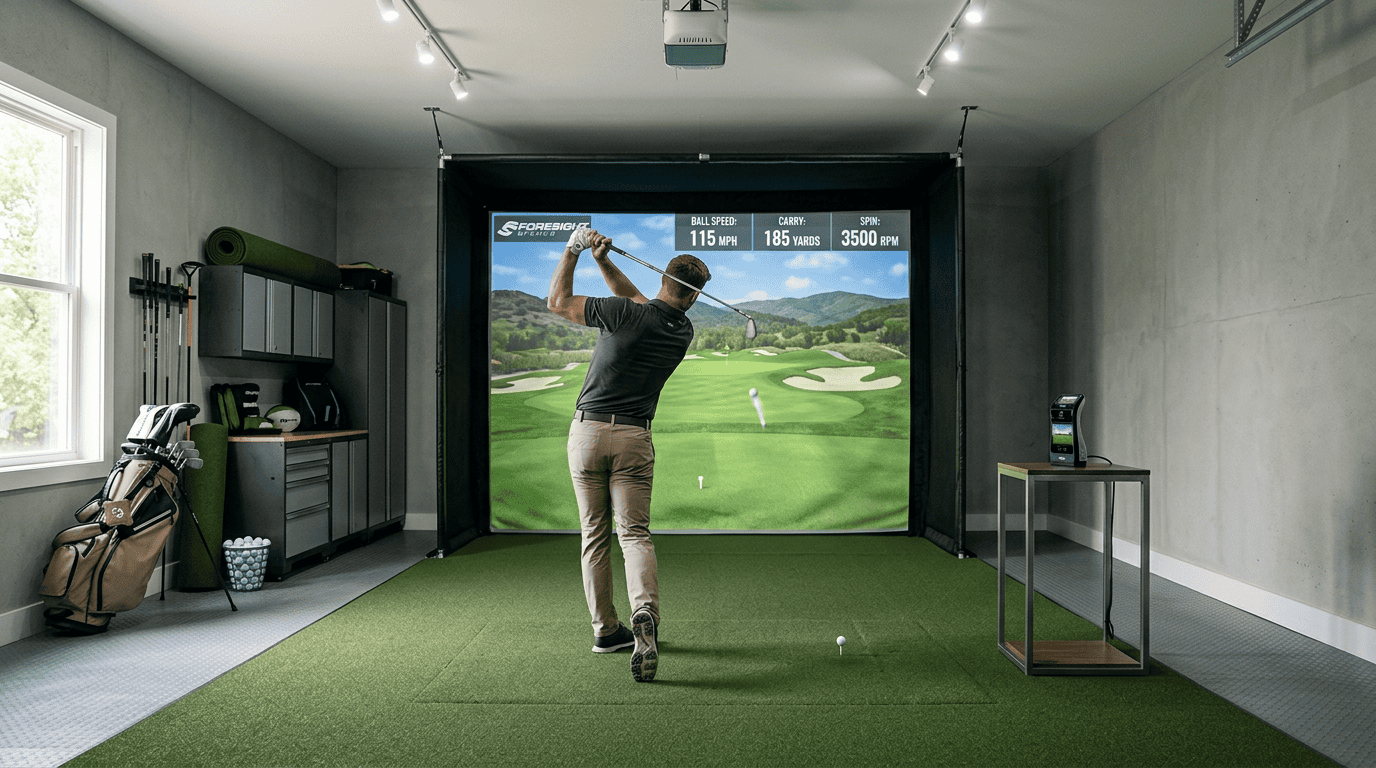
Stage 3: Upgrading Your Launch Monitor and Refining the Setup

By Stage 3, you’ve moved beyond basic practice and want measurable feedback with a more immersive experience. This stage focuses on accuracy, comfort, and realism, key for serious practice or casual play. We’ll cover how to upgrade your launch monitor, improve flooring, and add audio and secondary displays without overspending.
Your launch monitor is the backbone of your simulator. If you started with an entry-level model like the Garmin R10, upgrading to a mid-range or premium unit unlocks better accuracy, more data points, and software compatibility. Here’s how to decide:
- When to upgrade: If you’re missing club data (e.g., face angle, path) or notice inconsistent readings, it’s time. Mid-range monitors like the Mevo Gen2 or GC3S add these metrics and integrate with premium software such as Awesome Golf or E6 Connect.
- Budget range: Mid-range monitors cost $2,000–$7,000. Premium models like the Trackman iO exceed $10,000 but offer tour-level accuracy.
- Compatibility check: Ensure your new monitor works with your existing software and enclosure. Some premium models require specific lighting or space.
Avoid the mistake of upgrading too early. If your current monitor still meets your needs, prioritize visuals or mats first.
Entry-level mats protect floors but lack realism. Premium mats like TrueStrike or Fiberbuilt mimic turf feel and reduce joint strain. Here’s what to consider:
- Material: Fiberbuilt mats use dense turf fibers for a realistic strike. TrueStrike’s gel layer absorbs shock, ideal for high-volume practice.
- Size: Measure your space. A 5’x5’ mat fits most setups, but larger areas benefit from 6’x10’ or custom-cut options.
- Flooring: Add interlocking foam tiles or rubber flooring for comfort and noise reduction. This is especially useful if you’re converting a garage or basement.
Pair your mat with a hitting strip (e.g., TrueStrike’s 3’x10’ strip) to extend durability. Avoid cheap alternatives, they wear out quickly and can damage clubs.
Adding Audio and Secondary Displays
Audio and secondary displays transform your simulator from functional to immersive. Here’s how to add them without clutter:
- Audio: Start with a soundbar or bookshelf speakers. Position them at ear level for realistic course ambiance. Avoid subwoofers, they can distort launch monitor readings.
- Secondary displays: Use a tablet or small monitor to show swing data, course maps, or multiplayer scores. Mount it near your hitting area for easy reference.
- Cabling: Use cable management clips or conduits to keep wires tidy. Wireless options (e.g., Bluetooth speakers) reduce clutter but may introduce latency.
For a seamless setup, sync your audio and displays with your simulator software. Some programs, like Awesome Golf, support multi-screen setups out of the box.
Check Also: Golf Simulator Home Theatre Combo Guide
Common Mistakes to Avoid When Upgrading Your Setup
Planning a golf simulator upgrade path saves money and frustration. Many golfers rush into purchases without considering long-term needs. These mistakes can lead to wasted funds, incompatible parts, or a setup that feels uncomfortable after a few sessions. We’ll cover four key pitfalls to avoid as you build your system.
Neglecting Space and Clearance Measurements
Room dimensions dictate what components you can use. A projector needs enough throw distance to fill the screen, and a hitting mat requires space for a full swing. Measure ceiling height, wall-to-wall distance, and depth from the hitting position to the screen. Most setups need at least 10 feet of width, 10 feet of depth, and 9 feet of ceiling clearance.
- Ceiling height: Low ceilings may limit driver use or require a tilted enclosure.
- Side clearance: Tight spaces can cause club collisions with walls or furniture.
- Projector placement: Short-throw projectors work in smaller rooms but cost more.
Skipping measurements often leads to expensive fixes, like custom enclosures or last-minute room modifications. Use painter’s tape to mark boundaries before buying any equipment.
Overspending on Visuals Before Data Accuracy
A high-end projector or 4K screen won’t improve your game if the launch monitor gives unreliable data. Many golfers prioritize visuals over accuracy, only to replace their monitor later. Start with a launch monitor that provides consistent ball speed, spin, and launch angle readings. Entry-level models like the Garmin R10 or Mevo+ work for casual play, while mid-range options like the FlightScope Mevo+ or Foresight GC3 offer better precision for serious practice. For a deeper breakdown of setup mistakes, see our guide to avoiding common mistakes when setting up a DIY golf simulator.
- Budget allocation: Spend 40-50% of your initial budget on the launch monitor.
- Upgrade path: Choose a monitor that integrates with future software or enclosure upgrades.
- Test before buying: If possible, demo the monitor to check data consistency.
Visuals can wait. A basic screen or net paired with a reliable launch monitor delivers better results than a premium setup with flawed data.
Ignoring Ongoing Software Subscription Fees
Software subscriptions add up over time, so compare golf simulator software subscription models before you commit to a launch monitor or course package. Some launch monitors include basic software, but premium features often require monthly or annual fees. For example, E6 Connect charges $300/year for full course access, and TGC 2019 requires a one-time purchase plus updates. Factor these costs into your budget early to avoid surprises.
- Free vs. paid: Some software, like Garmin Golf, offers free courses but limited features.
- Bundle deals: Some launch monitors include a year of software, reducing upfront costs.
- Long-term costs: A $20/month subscription adds $240/year to your budget.
Track subscription costs alongside hardware expenses. Skipping this step can lead to unexpected bills or a system you can’t fully use.
Skimping on Hitting Mat Quality
Cheap hitting mats feel harsh and can cause discomfort or injury over time. A good mat absorbs impact, mimics turf feel, and lasts through thousands of swings. Entry-level mats like the Callaway Hitting Mat work for occasional use, but frequent players should invest in premium options like the TrueStrike or Fiberbuilt. These mats reduce joint stress and provide better feedback on ball contact.
- Thickness: Mats under 1 inch often lack cushioning.
- Durability: Look for replaceable turf sections to extend the mat’s lifespan.
- Feel: Test mats in-store if possible, or read reviews for feedback on realism.
A poor mat can ruin practice sessions. Prioritize quality early to avoid replacements later.
Frequently Asked Questions
How should I prioritize upgrades when moving from a net to a full golf simulator?
Start with safety and data accuracy. Upgrade to a launch monitor first, it’s the core of your simulator and affects every shot. Next, add a mat that mimics real turf conditions, followed by a screen or enclosure to protect your space and improve visual feedback. Save projector and software upgrades for later when you want a more immersive setup.
Which components are essential in the first stage versus optional later upgrades?
Essential first-stage components include a launch monitor, impact net or screen, and hitting mat. These provide the foundation for accurate feedback and safe practice. Optional later upgrades include a projector, premium software, enclosure, and high-end turf, these add realism but aren’t critical for basic use.
How do space and ceiling height affect when I can add an enclosure, screen, and projector?
Minimum room dimensions for a full enclosure are typically 10 feet wide, 15 feet long, and 9 feet high. If your space falls short, start with a net and mat, then add a screen and projector once you expand or adjust your layout. Low ceilings may need a short-throw projector or ceiling-mounted screen to avoid shadows.
What is the best way to convert an existing practice net into a simulator screen setup?
Use a retrofit kit like the Net Return Simulator Kit, which adds an impact screen and valence to compatible nets. Make sure your net is sturdy enough for repeated ball strikes, and position it at least 8–10 feet from the hitting area to prevent damage. Pair it with a launch monitor and mat for a complete setup.
When is it worth upgrading my launch monitor compared with visuals or mats?
Upgrade your launch monitor when you need more precise data, like club path or spin rates, for skill development. Hold off on visual or mat upgrades if you’re satisfied with basic feedback but want better accuracy. For example, moving from a Garmin R10 to a GC3 or Mevo+ improves data quality, while a TrueStrike mat improves turf feel.
Final Thoughts
A staged upgrade path turns a golf simulator from a distant dream into a realistic project. We tested the approach and found that starting with a reliable net, hitting mat, and launch monitor gives you a functional setup without breaking the bank. Later stages can add a screen, projector, and premium turf as your budget and space allow. The key is choosing components that work together now and in the future, skip the cheap mats that feel like concrete and launch monitors that won’t connect to your next screen or software upgrade.
Measure your space first, then prioritize accuracy over visuals. If you are still mapping out the total spend, use our guide to how much a golf simulator costs before locking in your upgrade order.. Software subscriptions and ongoing costs add up fast, so include them in your initial budget. Start small, test what works for your swing, and upgrade only when you’re ready. A well-planned simulator grows with you, no wasted money, no regrets.