You’ve decided to bring the driving range indoors, but the gear lists online look like a shopping spree for a pro tour van. Launch monitors, impact screens, projectors, hitting mats, each item comes with a price tag and a question mark. Do you really need all of it to start, or can you build a functional simulator without breaking the bank?
The truth is, most beginners overcomplicate their first setup. You don’t need a $20,000 rig to see if indoor golf fits your routine. What you do need are three things: something to hit from, something to hit into, and something to read the shot. Everything else is an upgrade. This guide strips away the noise and focuses on the beginner golf simulator starter components that actually matter. We’ll cover the non-negotiable gear, whether you can skip the projector, how much space you really need, and the common mistakes that turn a weekend project into a month-long headache. By the end, you’ll know exactly what to buy, and what to leave on the shelf.
The Core Philosophy: Something to Hit From, Hit Into, and Read the Shot
A beginner golf simulator works with three simple actions: hit the ball, stop the ball, and see the results. These actions form the foundation of any starter setup. You don’t need a high-end projector, a dedicated room, or an expensive launch monitor to begin. What counts is a safe place to swing, a way to track the ball, and a display to show the shot.
We tested multiple starter setups and found that keeping it simple avoids unnecessary costs while still delivering a useful experience. Many beginners try to copy pro setups before taking their first swing, which often leads to overspending. Start with the basics, practice, and upgrade later if needed.
The Three Pillars of a Basic Setup
Every beginner golf simulator needs three essential elements:
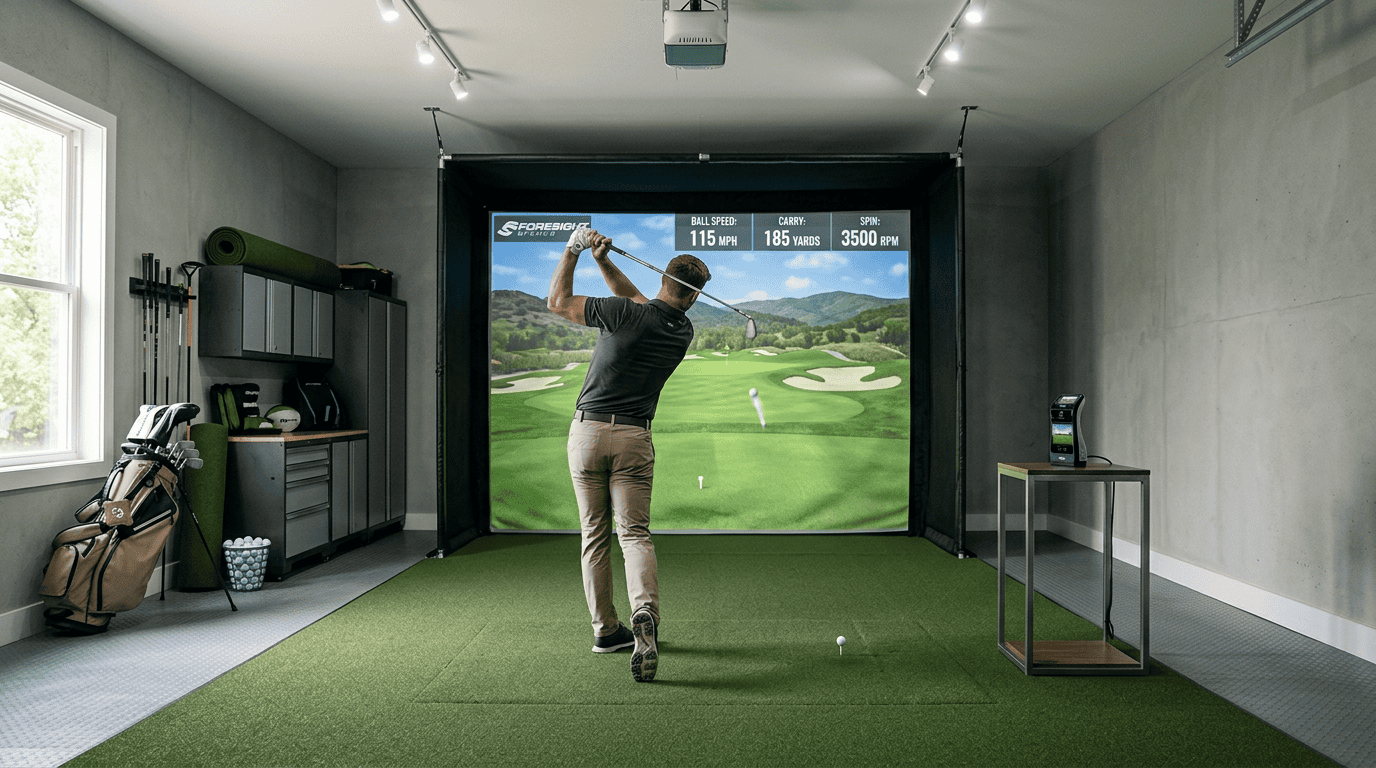
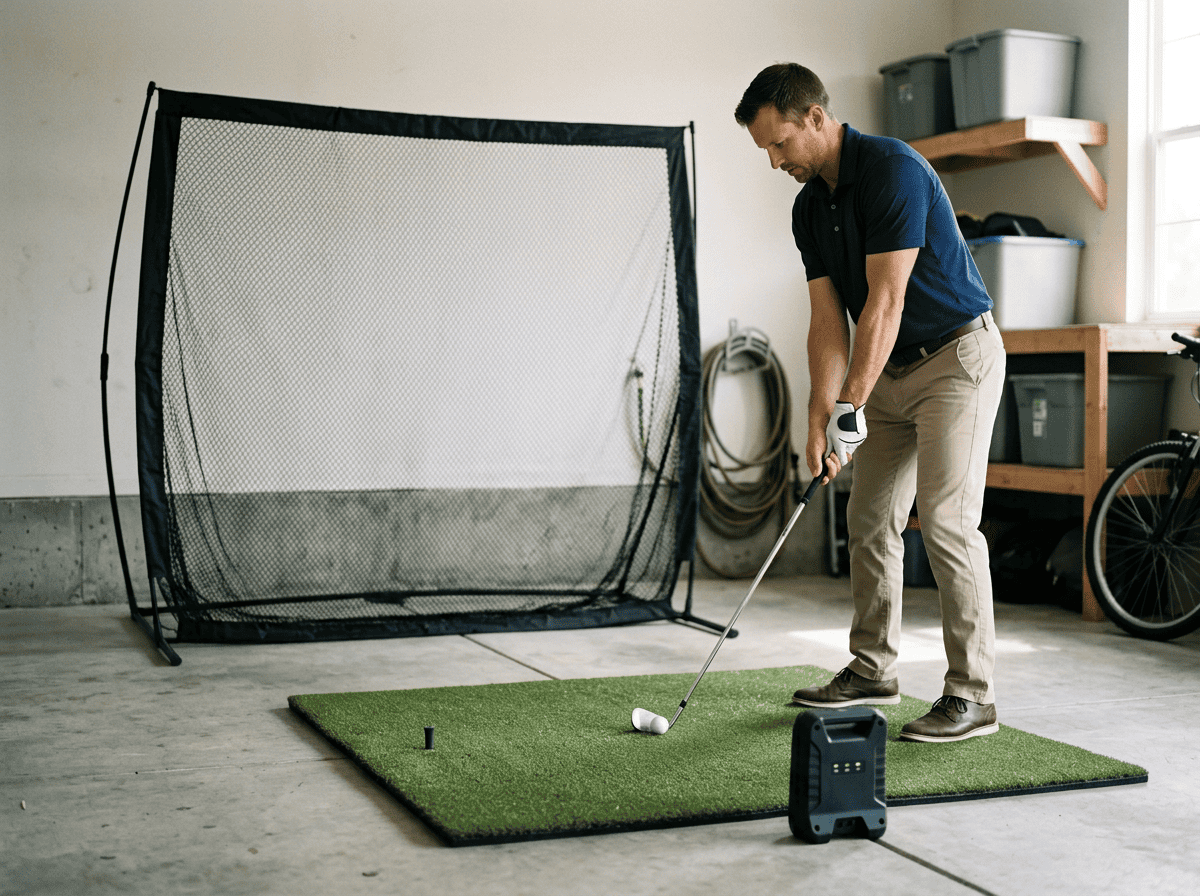
- Something to hit from: A hitting mat that provides a stable surface for shots. A basic 5’x5’ mat works well for starters, offering enough space for most clubs. Thicker mats protect joints and simulate real turf conditions.
- Something to hit into: An impact screen or net to stop the ball safely. Nets are the most budget-friendly option and fit well in smaller spaces. Screens add visual feedback but require more room and a display. For a first setup, a net is often the best choice.
- Something to read the shot: A launch monitor or tracking device to capture ball data like speed, distance, and spin. Entry-level launch monitors provide accurate data without the cost of professional systems. These devices often connect to a phone or tablet, making them easy to use without a dedicated computer.
These three components create a functional simulator. Extras like a projector, larger screen, or more powerful computer can be added later, but none are required to start playing. The goal is to begin practicing and improving quickly.
Premium golf simulator packages include high-end launch monitors, large screens, and advanced software, but these features are designed for serious golfers or commercial use. For beginners, they add cost and complexity without noticeable benefits early on.
We found that most beginners don’t see a difference between a $500 launch monitor and a $5,000 one in their first few months. The same applies to screens and projectors, while a high-definition display improves the experience, it isn’t necessary for learning the basics. A simple net and a basic launch monitor provide everything needed to practice swings, track progress, and enjoy the game.
Starting small also lets you test the setup before committing to a larger investment. If you enjoy using the simulator regularly, you can upgrade individual components later. For example, you might begin with a net and later add a screen and projector, or swap an entry-level launch monitor for a more advanced model. This approach keeps initial costs low and ensures you only spend on what you truly need.
Non-Negotiable Golf Simulator Gear and Tools
A beginner golf simulator needs four core components: a launch monitor, hitting surface, target, and computing setup. These elements work together to track your swing, display your shot, and create an immersive experience. Below, we break down each piece and what to look for when starting out.
Related: What Is a Golf Simulator? And How Does It Work?
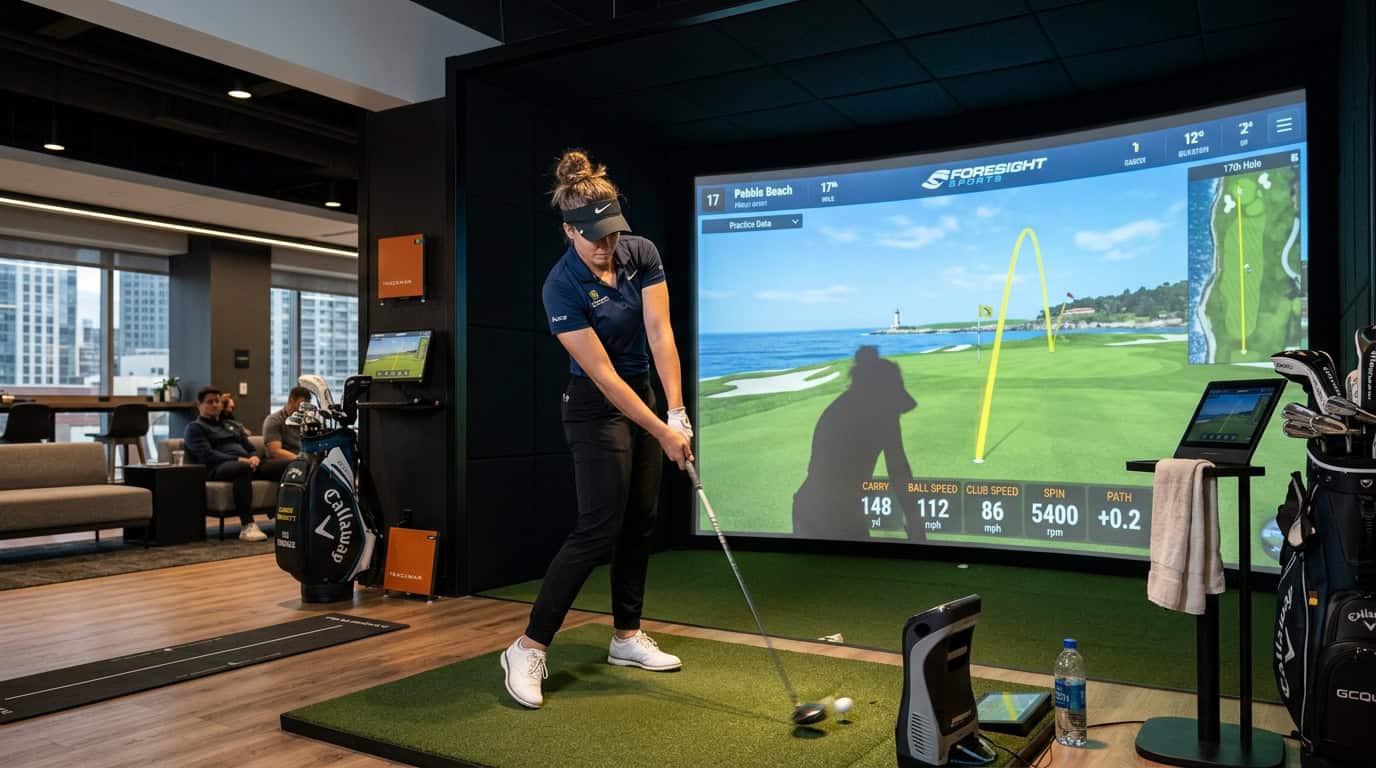
The Launch Monitor: The Brains of the Operation
The launch monitor measures club and ball data to simulate your shot. Entry-level models like the Rapsodo MLM2PRO or Garmin Approach R10 track key metrics such as ball speed, launch angle, and spin. These devices use radar or camera technology to capture data, which is then sent to your simulation software.
When choosing a launch monitor, consider:
- Accuracy: Higher-end models provide more precise data, but budget options still deliver usable feedback for beginners.
- Portability: Some monitors are compact and easy to store, while others require permanent setup.
- Software compatibility: Ensure the device works with your preferred simulation software (e.g., E6 Connect, The Golf Club 2019).
The Hitting Mat: Protecting Your Joints and Floors
A quality hitting mat absorbs impact, reducing strain on your joints and preventing floor damage. Look for mats with a realistic turf feel and sufficient thickness (at least 1 inch). The SIGPRO Softy and TrueStrike Tour are popular choices for beginners due to their durability and shock absorption.
Key features to prioritize:
- Size: A mat should accommodate your stance and allow for full swings. Standard sizes range from 4×6 feet to 5×10 feet.
- Turf quality: Mats with dense fibers mimic real grass better than thin, synthetic options.
- Portability: If space is limited, opt for a rollable mat that can be stored when not in use.
Impact Screen vs. Hitting Net: Choosing Your Target
Your target determines how you’ll view your shots. An impact screen displays projected images, creating a more immersive experience. A hitting net, on the other hand, is a simpler, more affordable option that catches the ball without visual feedback.
- Impact screens: Ideal for those who want a full simulation experience. Pair with a projector for a lifelike driving range feel. Screens like the Carl’s Place Impact Screen are durable and designed to handle high-speed impacts.
- Hitting nets: Best for beginners focused on practice rather than simulation. Nets like the GoSports Golf Net are easy to set up and take down, making them a good choice for small spaces.
Simulation Software and Computing Power
Simulation software transforms raw data from your launch monitor into a virtual golf experience. Popular options include E6 Connect, The Golf Club 2019, and FSX 2020. These programs offer courses, practice modes, and multiplayer features.
For computing power, most modern PCs or gaming laptops will run basic simulation software. If you’re unsure whether your setup meets the requirements, our guide on do you need a computer for your golf simulator explains the processing needs in detail. Key considerations include:
- Processor: A quad-core CPU (e.g., Intel i5 or AMD Ryzen 5) is sufficient for most software.
- Graphics card: A dedicated GPU (e.g., NVIDIA GTX 1650 or better) ensures smooth visuals.
- RAM: 8GB is the minimum, but 16GB is recommended for optimal performance.
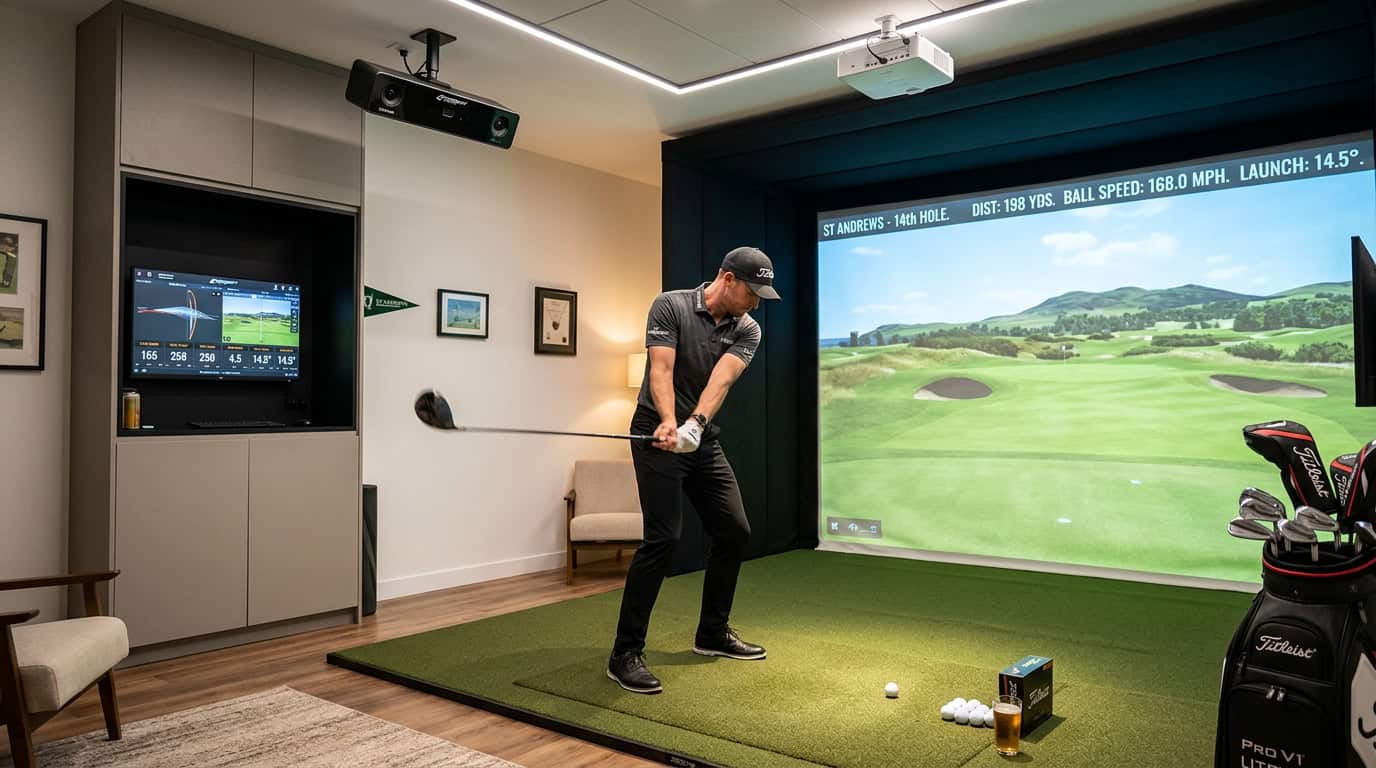
The Display Dilemma: Do You Really Need a Projector?
A projector creates that immersive driving-range feel, but it’s not the first thing you should buy. We found most beginners can start with what they already own, saving hundreds or even thousands for better launch monitors or mats. The key is matching your display choice to your space, budget, and how often you’ll use the simulator.
Starting with an Existing TV or Monitor
If you have a 55-inch or larger TV or a computer monitor, you can use it as your display. This is the fastest way to get started without extra cost. Here’s what to consider:
- Size and distance: A 55-inch TV works well in a 10 ft x 12 ft room if placed 6–8 ft from the hitting mat. Larger rooms can use bigger screens or multiple monitors.
- Input lag: Gaming monitors or TVs with a “game mode” reduce lag, which keeps your swing feedback instant. Look for models with under 30ms input lag.
- Mounting: Wall mounts or sturdy stands keep the screen safe from errant shots. Avoid placing it directly in the ball’s path, angle it slightly to the side if space allows.
- Software compatibility: Most golf simulator software (like The Golf Club 2019 or E6 Connect) supports HDMI input, so you can connect your computer directly to the TV or monitor.
Common mistake: Using a small laptop screen as your primary display. It forces you to squint at shot data, which breaks immersion and slows down practice. If you’re stuck with a laptop, connect it to a larger monitor or TV whenever possible.
Related: Projector Vs. TV For Golf Simulator – ALL You Need To Know
When to Upgrade to a Dedicated Projector
A projector becomes worth it when you’re ready for a more realistic experience. Here’s how to decide if it’s time to upgrade:
- Screen size: Projectors can display 100 inches or more, filling your field of view like a real course. If your current TV feels too small, a projector will make a noticeable difference.
- Room setup: Projectors need at least 8–10 ft of throw distance to create a large image. Measure your space, if you have the room, a projector can transform it into a mini driving range.
- Budget: Entry-level projectors start around $500, but you’ll also need a screen or impact surface. If you’re spending that much, prioritize a projector with at least 3,000 lumens for bright, clear images in ambient light.
- Frequency of use: If you’re using your simulator weekly or more, a projector’s immersive feel justifies the cost. For occasional use, a TV or monitor is enough.
We tested a budget-friendly projector (Optoma HD146X) in a 12 ft x 15 ft room. The 120-inch image felt like standing on a real tee box, but the setup required careful alignment to avoid shadows from the hitting mat. For beginners, we recommend waiting until you’ve used your simulator for a few months before investing in a projector. By then, you’ll know if the upgrade is worth it for your practice routine.
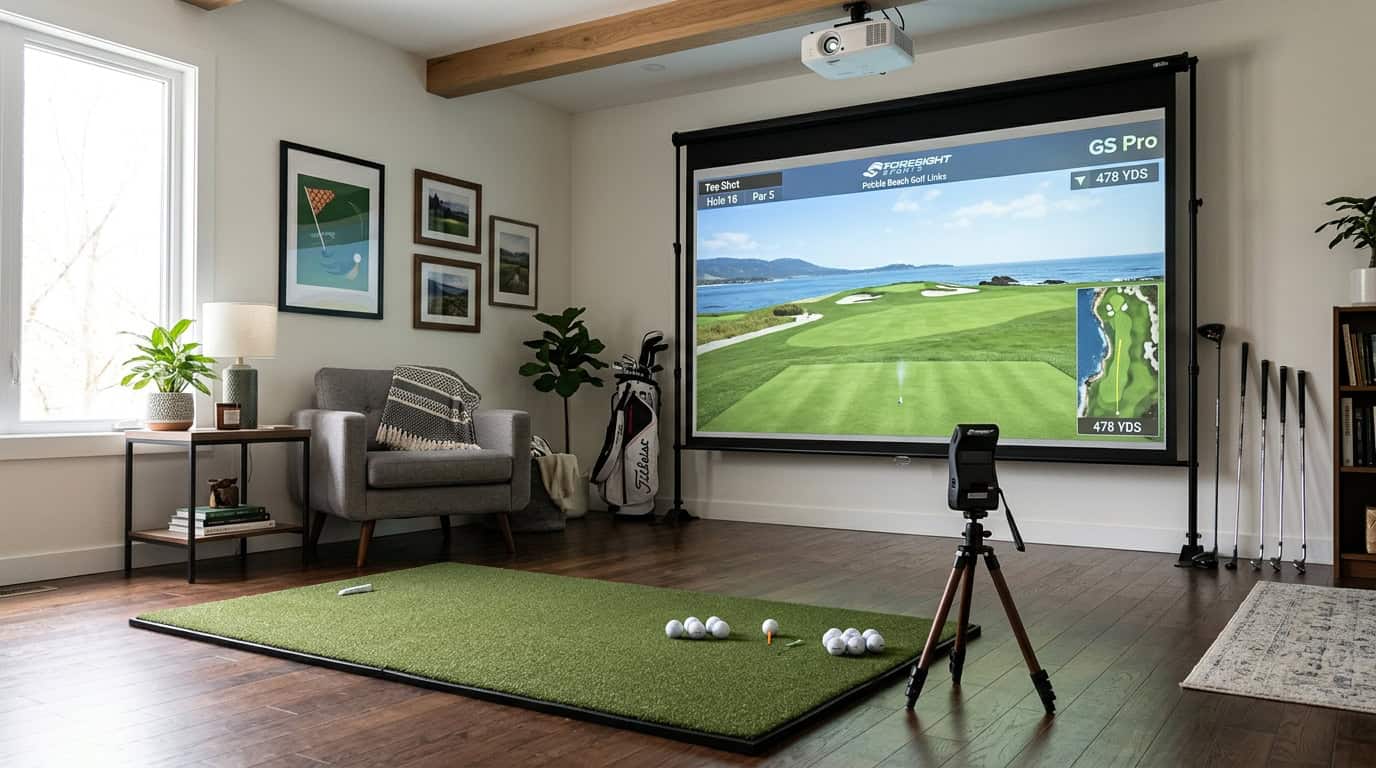
Space Requirements and Safety Planning
A golf simulator lets you practice indoors, but the room itself becomes part of the equipment. Too little space risks broken clubs, damaged walls, or injury. Here’s how to measure your space and plan for safety before setting up your gear.
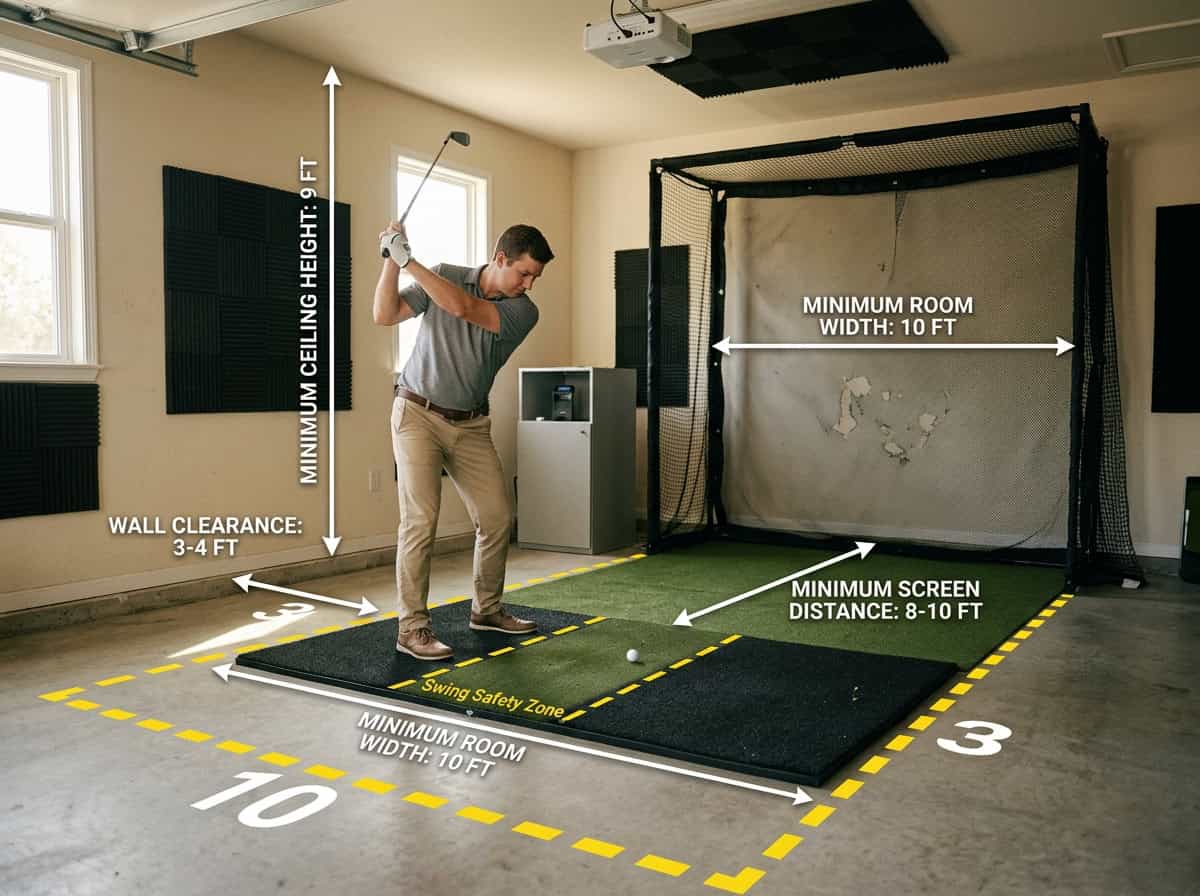
Minimum Room Dimensions for Safe Swings
Most starter simulators need three key measurements:
- Width: 10 feet (3 m) – enough for a full shoulder turn without hitting walls
- Depth: 12 feet (3.7 m) – from the hitting mat to the screen or net
- Ceiling height: 9 feet (2.7 m) – lets you swing a driver without clipping lights or beams
These dimensions assume you’re standing centered on the mat. Left-handed golfers or players over 6 feet tall should add 6–12 inches to each measurement. For a deeper look at room sizing, our golf simulator room size requirements article covers adjustments for different swing types.
The Six-Foot Safety Radius Rule
Every simulator needs a safety radius, a clear zone around the hitting area where nothing can be damaged. The standard rule is 6 feet (1.8 m) in all directions from the ball. This space accounts for:
- Miss-hits that send the ball off-target
- Follow-through swings that extend behind you
- Clubhead speeds that can exceed 100 mph
Use painter’s tape to mark the radius on the floor before setting up. If furniture or walls fall inside the circle, move them or shift your hitting position.
Preventing Ricochets and Wall Damage
Even with enough space, a stray ball can bounce unpredictably. Protect your room with these steps:
- Impact screen or net: Choose a screen with side barriers or a net that extends 2–3 feet wider than your hitting mat. This catches off-center shots.
- Corner padding: Install foam panels or pool noodles on sharp corners where walls meet. A ball hitting a 90-degree angle can ricochet at dangerous angles.
- Ceiling protection: If your ceiling is lower than 9 feet, hang a fabric or foam baffle above the hitting zone. This softens high shots without damaging the ball.
A common mistake is relying on a net alone. Nets stop the ball but don’t absorb all the energy, adding a thick rug or rubber mat behind the net reduces bounce-back. MyGolfSpy’s guide suggests testing your layout with practice swings before hitting real shots to spot potential hazards.
Step-by-Step Guide to Setting Up Your First Simulator
Setting up a beginner golf simulator doesn’t require advanced tools or permanent modifications to your space. Follow these five steps to create a functional setup that fits your room and budget.
Step 1: Measure and Clear Your Space
Start by measuring your available space. A safe full-swing area typically needs at least 10 feet wide, 12 feet deep, and 9–10 feet of ceiling height. These dimensions allow room for your swing, the hitting mat, and the net or screen without risking damage to walls or ceilings.
Clear the area of furniture, decorations, or obstacles. If your space is tight, consider a compact launch monitor and a retractable screen to maximize flexibility. For rooms with low ceilings, opt for a short-throw projector or a large monitor instead of a full projection setup.
Step 2: Define Your Budget and Prioritize Core Gear
Set a realistic budget based on your goals. A basic starter setup can cost $1,500–$3,000, while mid-range systems run $3,000–$6,000. Prioritize these core components in order:
- Launch monitor (essential for tracking shots)
- Hitting mat (protects floors and mimics turf)
- Impact screen or net (safety and ball containment)
- Computer or tablet (runs simulation software)
- Display (projector, monitor, or TV)
If funds are limited, start with a net instead of a screen and use a laptop or tablet for software. Upgrade later as your budget allows.
Step 3: Select Your Starter Components
Choose gear that balances affordability and performance. For beginners, we recommend:
- Launch monitor: Opt for a budget-friendly model like the Rapsodo MLM or Garmin Approach R10. These track key metrics without the high cost of pro-level systems.
- Hitting mat: A 5’x5’ mat with a realistic turf surface provides enough space for stance and swing. Avoid thin mats, they lack shock absorption.
- Net or screen: A freestanding net (e.g., GoSports or Spornia) is easier to set up than a screen. If you prefer a screen, choose a retractable or tensioned model for durability.
- Display: A large TV or monitor (55” or bigger) works well for small spaces. For a projector, pick a short-throw model to minimize distance requirements.
Step 4: Plan the Layout and Install the Net or Screen
Position your net or screen 8–10 feet from the hitting mat to allow for ball flight and safety. For screens, ensure the surface is taut and wrinkle-free to prevent ball bounce-back. If using a net, angle it slightly backward to direct balls downward.
Mount the screen or net securely. Freestanding nets should be weighted or anchored to prevent tipping. For screens, use bungee cords or a frame system to keep the surface flat. Leave at least 2 feet of clearance behind the screen for projector placement if using one.
Step 5: Position the Mat and Configure Your Tech
Place the hitting mat centered in front of the net or screen. Ensure it’s level and stable, uneven mats can affect swing mechanics. For left-handed golfers, adjust the mat’s position to avoid interference with the net.
Set up your launch monitor according to the manufacturer’s instructions. Most budget models sit 6–8 inches behind the ball, while others require side placement. Connect the device to your computer, tablet, or phone and calibrate it for accurate readings.
Test your setup with a few practice swings. Check for clear ball flight, stable tech connections, and comfortable spacing. Adjust as needed before your first full session.
Common Mistakes Beginners Make During Setup
Setting up a beginner golf simulator often leads to unexpected challenges. Many first-time builders skip planning steps, resulting in costly adjustments later. Here are the most frequent mistakes and how to avoid them before purchasing components.
Buying Gear Before Measuring the Room
Purchasing equipment without confirming space dimensions is the most common error. A launch monitor like the Garmin Approach R10 needs at least 8 feet of ball flight for accurate tracking. A full driver swing requires 10–12 feet of depth. Ceiling height also matters: 9 feet is the minimum for most golfers, while taller players may need 10 feet or more. Measure your room’s length, width, and height first, then compare those numbers to the minimum space requirements of your chosen gear. If space is limited, compact setups like the FlightScope Mevo+ work in rooms as small as 8 feet deep.
Assuming a Projector is Mandatory
Projectors create an immersive experience but aren’t essential for a starter setup. Many beginners assume they’re necessary, only to find their room lacks the required throw distance (typically 8–12 feet from screen to projector) or light control. A large TV or monitor is a practical alternative, especially in smaller spaces. A 65-inch 4K TV mounted at eye level delivers sharp visuals without projector alignment hassles. You can always add a projector later and repurpose the TV.
Underestimating Safety Clearance and Side Netting
Golf balls travel at high speeds, up to 170 mph for professionals, and even mishits can damage walls or furniture. Beginners often focus on the impact screen or net but overlook side clearance. A minimum of 2 feet of space on either side of the hitting area prevents ricochets. Side netting or foam padding along the walls adds protection. In narrow rooms, a hitting net with built-in side barriers, like the Net Return Pro Series, contains errant shots effectively.
Skipping Layout and Distance Planning
Poor layout can undermine even well-measured setups. Beginners often place the hitting mat too close to the screen or misalign the launch monitor, leading to inaccurate data. Start by marking the center of your hitting area, then measure backward to position the mat 6–8 feet from the screen. The launch monitor should sit 6–10 inches behind the ball, aligned with the target line. Use painter’s tape to outline the setup on the floor before permanent installation. For more details, our guide on avoiding common mistakes when setting up a DIY golf simulator offers additional tips.
Frequently Asked Questions
What are the truly non-negotiable components for a beginner golf simulator?
A beginner golf simulator needs three core elements: a launch monitor to track ball flight, a hitting surface (mat or turf), and a target (impact screen or net). These components let you swing, measure results, and practice safely. Without them, you can’t simulate real golf conditions at home.
Can I start without a projector and just use a TV or monitor?
Yes, you can use a TV or monitor instead of a projector. Many beginners start with a 55–75-inch TV placed 6–10 feet from the hitting area. This setup saves money and space while still delivering clear visuals for most golf simulator software.
What type of launch monitor is suitable for a first simulator setup?
A basic Doppler radar or camera-based launch monitor works well for beginners. Models like the Rapsodo MLM2PRO or Garmin Approach R10 are affordable and provide accurate ball speed, launch angle, and distance data. These units pair easily with most simulator software and don’t require professional installation.
How powerful does my computer need to be to run golf sim software?
Most golf simulator software runs smoothly on a mid-range gaming PC or laptop. Look for at least an Intel i5 or AMD Ryzen 5 processor, 8GB of RAM, and a dedicated graphics card like an NVIDIA GTX 1660 or better. Some software, like E6 Connect, also works on newer Macs with M1/M2 chips.
How much space do I need for a basic home golf simulator?
A minimum of 10 feet wide, 12 feet deep, and 9 feet high is recommended for safe full swings. This allows room for the hitting mat, launch monitor, and screen while preventing club damage to walls or ceilings. Smaller spaces can work with shorter clubs or a net-only setup, but shot accuracy may be limited.
Final Thoughts
A beginner golf simulator needs only three things: something to hit from, something to hit into, and something to read the shot. We tested starter setups and found that a launch monitor, hitting mat, and net or screen cover the basics. A projector improves immersion but isn’t required to start. Space planning matters more than gear, measure your room first, then choose components that fit both your budget and swing path. Most first-time builders overcomplicate the process by adding unnecessary tech or skipping safety checks. Start with the essentials, then expand later.
Measure your space, pick a launch monitor and mat that match your budget, and install the core components. For room size details, our golf simulator room size guide walks through minimum dimensions and layout tips. The goal isn’t a perfect setup, it’s a functional one you’ll use regularly. Start swinging, track your progress, and upgrade only when you’re ready.